Tuesday, October 28, 2008

Allegro Lite Build Part 8 (at long last...)

It's been a while since the last post, my only excuse is that I have at least started again with the Allegro build. Since the last post on the AL I have acquired another AL shortkit and a Bubbledancer shortkit with booms! Now it's time I seriously start building, I've lost count of all the entries on my "still-to-build-list". Let's see.... there's the two Allegros (one thermal, one electric), the Bubble Dancer, Sailaire, Dynaflite Talon, a ±4m DG800, two Hill Billys, a Slipso 400 and a carbon slope aerie from Craig Baker.... Eish! So many projects so little time.

Back to the Allegro build. I have progressed quite well on the tip panels. Before continuing I first had to read up again on the instructions to make sure I am not forgetting something. The next step was to make the hardwood inserts that go inline with the shearwebs at the dihedral breaks. This prevents the soft balsa from being crushed during launches. Then I sanded in the recesses for the carbon carry through strips so that the carbon spar caps would sit flush and not make unsightly bulges. The carry through strips were epoxied in place at this stage.


Time to get sticky again. After doing another dry mockup of all the components, I made up some "goop" with cabosil thickened epoxy. To keep everything true and straight I am working on a glass top. At first I though it may cause problems not being able to pin anything to a building board but if you take care in aligning the parts correctly and use some masking tape in strategic places it all works out quite well. The cabosil mix is quite sticky which aids in keeping everything aligned. Carefully weighing everything down with small sand bags ensures that nothing moves out of place while drying.

After curing overnight the next step was to carefully sand the edges of the spar slightly round to eliminate sharp edges. This is important as the you now have to wrap the spar with kevlar tow and you don't want the edges cutting the kevlar. The kevlar wraps prevent the sparcaps from delaminating from the shearwebs and buckling. I got the kevlar tow from unraveling kevlar tape that I bought from AMT. The actual wrapping is quite hard on the muscles in your hand. I found the trick was to wind the tow on a dowel which I pinched between my toes! This way I had both hands free to do the winding ;o) The ends are tacked with CA and the wraps then wetted out with epoxy. Any excess is dabbed off with a paper towel. I am really trying to keep weight down on this bird and any careless use of glues, epoxies etc quickly add up to unneccesary weight.

Not having to wait for the wraps to dry (they weren't going anywhere...) I proceeded to glue in the leading and trailing edges. The root rib is then glued in, gussets added and the tip sheets glued in. I decided to apply a technique I learned when building the Sagitta 900 that ensures perfectly straight, sharp and very robust trailing edges that can take quite a knock before showing hangar rash. The last 5-6 mm of trailing edge is sliced off with an exacto, a spruce strip glued in it's place and carefully sanded to the correct profile to blend in with balsa TE. You end up with superb trailing edges that you simply cannot obtain with balsa. And this is what the tip panels look like at this stage. Sheeting the panels to follow next.

Friday, October 10, 2008

F18 Build - Finale

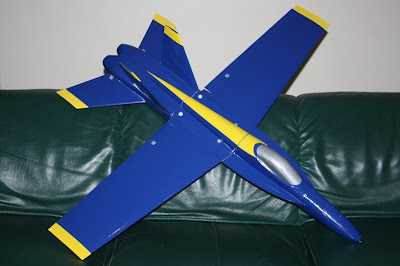
Couldn't resist one more post before we hit the mountain tomorrow. As I still had some time left I decided to add the forebody strakes to add to the realism. I finished her last night and was very surprised when I found that I didn't have to add any additional weight to her slim and sexy 1.075kg....;o) Here are some specs:

Weight : 1.075 kg
Wingspan : 1.222 m
Root Chord : 245 mm
Tip Chord : 145 mm
Wing Area : 23.83 dm²
Wing Loading : 45g/dm² (14.25oz/ft²)
Airfoil (wing) : RG15
Airfoil (tail surfaces) : NACA0009

Here she is in all her glory barring some small decal work to be lovingly applied tonight.

Hawk & Hurricane

It's now t-24 and it looks like I might make it after all!

The weekend got the fuzzes glassed, but the HTL took the whole of Sunday. Monday & Tuesday were spent installing servos & linkages and glueing the tailfeathers. The superfast 30sec epoxy from AMT is a real godsend. :)
Wednesday was scheduled for painting but disaster struck. The red enamel went fine, but the brown Dulux 50ml tester I bought at a premium of R20 caused all the trouble. I expected that thinners thins most paint but not this PVA. Initially it was fine but then it turned into a sticky ball in the cup and ruberised everything inside the spray gun after about 10min, so I spent the rest of the night cleaning tools.

Bought some brown QD enamel on Thursday and repainted it Thursday evening. Finalised the noseweight & linkages, and added some colour along the line. The paint is now by far the most expensive item of the build.

Tonight (Friday) will install radio and noseweight for the Hawk and add some more cosmetics. Had to have a Red Bull on the way to work today, so the wind better blow!

Wednesday, October 8, 2008

F18 Build - Part 9

So I've finally finished covering the F18. Man that's a job I really hate, worse than working with fibreglass and epoxy, but the result in the end really is worth the trouble. And this is what it looks like. The Blue Angels will be proud...


Also started cutting the bottom wing decals and finished the one half. I am not 100% happy with the proportions but it will have to do as there is not enough time to nitpick now...


This will probably be the last post before the weekend as the rest is elementary stuff. fitting the control push rods, balancing etc.

See ya all at the ETB PSS Fest.

Tuesday, October 7, 2008

F18 Build - Part 8

Time is running out blazingly fast and having lost almost a week due to going away on leave has put me back somewhat. The precious little time remaining will be better spent working on the F18 than blogging away and not finishing in time.....

I have progressed in the meantime, having :

a.) glassed the wings (with "live" peel ply hinges), the fuselage and tailfeathers,
b.) "plumbed" the servos into the wing and fuselage
c.) covered the wing, the fins and half the fuselage.

Major steps still to follow are to finish covering all the bits and pieces, fit all the tailfeathers, make all the control pushrods, plumb in the battery pack way up in the nose of the fuselage, cut and apply all the decals, balance it and set up the programming on the radio.

Here are a couple of pics just to keep you coming back.....